Set Up A Picture Password In Windows 8 Step by Step Guide

|0 comments

You might have already familiar with Microsoft new operating system Windows 8. One new attractive feature has been added by Microsoft to Windows 8 is Picture Password log in which has been designed by keeping in mind to touch users. This touch friendly way to log in simply requires a user to draw a pre set pattern on a picture and Windows 8 will then allow log them in. 

Before we start, make sure you have got a picture which you want to use to draw your pattern on that. You can use any picture as per your choice.

1.First off you need to access open your charm bar. You can do this by just pressing Start button from keyboard and after that just put your cursor at the extreme right below corner of your screen. Here click on Setting icon.
2. Now click on Change PC Settings.
3. The next thing we need to do now is select Users and then Create a password for the selected user. If you are already using password for your account then you not need to Step 3. Simply go to Step 4.
4.  Now you need to do is select User and then Create A Picture Password.
5. Now just enter your password just to confirm the password for the selected user. After entering your password you are free to browse for the picture that you want to use as your picture password.
6.  Once you’ve selected the picture that you want to use you can now start drawing your pattern. Windows 8 will require you to enter in your pattern twice to learn it. Your password must have 3 gestures in it. You can choose a combination of drawing shapes, lines or tapping the screen. It does matter what order and direction these gestures are performed in so be sure that you remember it. However if you do forget it, you can log in to your Windows 8 using your normal password.
7. Now once you have successfully entered your gesture twice, Windows 8 will have learnt it and it’s now been set as your password.

Next time you go to log in, you’ll be asked to draw your password.


Password Protect Files and Folders with Free Folder Lock Software

|0 comments
Many a times when you keeps secret or confidential files on your computer or laptop then you may be worried about his security. Now, you no need to be Worried about the important and confidential files in your computer. Whatever is the partition type whether NTFS or FAT32 of Windows, you can easily protect your sensitive files and folders with a secure password.
There are many tools available on the internet to secure the files but most of them are trial versions or some lengthy to use. We have got a free software called Folder Lock which can easily safeguard your sensitive or private files and folders which you don’t want to share with the other users of the computer. Folder Lock supports Windows 7, Vista and XP (including their 32 and 64 bit variants).

Folder Lock is an excellent tool that can either encrypt or lock the data with a password chosen by you.

Some Features of Folder Lock:

•    Easy to use.
•    Uses 256-bit AES encryption which is difficult to crack.
•    File Lock, Folder Lock, Drive Lock, File Encryption and Folder Encryption.
•   What’s more is that you can easily password protect USB Drive or Lock CDs and DVDs without the need to install it on the other end.
•    Backup, Move, Email or transfer your password protected Lockers anywhere you want.
•    Use the tool in stealth mode (useful when hiding the tool from other users of the computer).

Just download this software and play with  options before protecting your secret stuffs.

Download Folder Lock Free

Download MiniTool Partition Wizard Home Edition for Windows 8

|0 comments
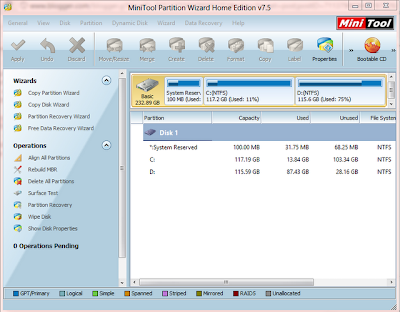
When microsoft has released Windows Vista then he has made a inbuilt tool which can create partition or resize existing partition without loss of data. After than microsoft has continued this tool in Windows 7 and Windows 8 also. But this inbuilt tool is not so good as as other tool which is available on the internet. So, we are writing about this new new tool which will help you if you have already installed Windows 8 on a new machine and looking for a good software to partition the hard drive. MiniTool Partition Wizard Home Edition v7.5 is the best solution if you are looking for a free tool to resize existing partition or want to create a new partition. MiniTool Partition Wizard Home Edition v7.5 works with Windows XP, 2000 Professional, Vista SP2, Windows 7 SP1 and Windows 8 (all editions, 32 bit and 64 bit).
In addition to the create, delete, format and copy partitions, it includes other options for power users also. There are options such as set label for the partition, align partition to improve disk performance, check file system for errors, hide partition, change partition serial number, change partition type ID, check partition for bad sectors, wipe partition, etc.
One other great feature of this MiniTool is that it includes partition recovery wizard also, which will help you to recover lost or deleted partitions in a few steps and also supports partition size upto larger than 2 TB.

The best thing about this software is that it is so easy to use. Just launch the program, select a partition to see all partition related options in the left side of the window. Right-clicking on a partition will also display all options. Advanced tasks can be found under file menus.

Download MiniTool Partition Wizard Home Edition

Download MKey Mini Flasher Latest V6.0.8

|2 comments
Recently MKey team has released the latest Version of MKey Mini Flasher V6.0.8. MKey supports almost modem which is available in the market. Recently MKey team has added some new firmware. Before you use this software you need MKey Dongle or MKey ToolBox. If you will run this software without MKey dongle then its will give you a error message Danger, Dongle not found. If you have business of unlocking the modem or repairing the modem then MKey is best option for you. 
In the latest some new features has been added.

Customized Modem 5 Second Unlock :-

Huawei E1750C Customized Firmware 11.126.16.05.850 India Aircel

Franklin - U600 4G
ZTE MF180 Customized Firmware BD_MF180SMARTV1.0.0B01 Philippines SmartBro

ZTE MF180 Customized Firmware BD_MF180SMARTV1.0.0B02 Philippines SmartBro

Mini-Flasher :-

ZTE Modems : S- Series by Mini-Flasher [Direct Downgrade/Rebrand Firmware] 

01. - ZTE MF190S BD_MBNEGMF190SV1.0.0B01 - Mobinil 
02. - ZTE MF190S BD_MBNEGMF190SV1.0.0B03 - Mobinil 
03. - ZTE MF190S BD_MF190SV1.0.0B05 - Etisalat 
04. - ZTE MF190S BD_MF190SV1.0.0B05 - GSELL 
05. - ZTE MF190S KYI_UA_MF190SV1.0.0B02 - Kyivstar 
06. - ZTE MF190S MTS_UA_MF190SV1.0.0B01 - MTC 
07. - ZTE MF190S UCE_UZ_MF190SV1.0.0B04 - UCEL 
08. - ZTE MF190S MET_KH_MF190SV1.0.0B03 - Metfone 
09. - ZTE MF190S MAXIS_MY_MF190SDV1.0.0B08 - Maxis 
10. - ZTE MF190S BD_IDEAMF190V1.0.0B01 -Idea 
11. - ZTE MF180S BD_MF180SV1.0.0B01 - Djuice 
12. - ZTE MF180S MTS_UA_MF180SV1.0.0B07 - MTC 
13. - ZTE MF180S ETI_EG_MF180SV1.0.0B02 - Etisalat 
14. - ZTE MF180S LIFE_UA_MF180SV1.0.0B02 - Life 
15. - ZTE MF180S KYI_UA_MF180SV1.0.0B04 - Kyivstar

Download link has been updated. File is password protected. For password leave your email via comment.

Download MKey Mini Flasher V6.0.8 (Size - 35 MB)

Reopen Recently Closed Folders and Applications with UndoClose Software

|0 comments

You may already familiar with today’s web browsers Chrome and Firefox,  its ability to reopen the recently closed tabs instantly. It may happen sometimes that you accidentally close a windows folder or application and wish to reopen them again to complete your work.

UndoClose can help you if you have accidently closed application or folder in windows while working. 
As the name of the tool, this tool can reopen the last closed folder or application instantly. For example, if you have closed a folder named kamlesh, Windows Media Player and Firefox (in the same order), then when you run this tool, it will open Firefox, WMP and kamlesh for you (in the last closed order).
UndoClose does not require any installation; you just have to double click it for it to run properly. It will stay in your system tray and start monitoring the apps and folders. To open the folders and apps, you don’t have to run it again and again, just use the shortcuts Ctrl + Shift + F (for Folders) and Ctrl + Shift + A (for applications) and it will open them for you automatically. These shortcuts can also be changed through settings.

The tool is very easy and light to use. Currently it supports only Windows 7  on both 32 and 64 bit versions. Only the thing you have keep in mind before UndoClose installation you need .Net Framework 3.5 pre-installed on your computer, then only you can install UndoClose. It is less than 150KB in size. Just try this great software and enjoy.


Download Bitdefender Antivirus Plus 2013 : Windows 8

|0 comments

Good news for Windows 8 users. Bitdefender has just released Antivirus Plus 2013, Internet Security 2013, and Total Security 2013 products with new user interface, features, and enhancements. USB immunizer, safepay, and anti-theft are the main attractions of this new version of Bitdeender.

While Bitdefender safepay and USB immunizer features are present in all three products, Device anti-theft feature is available only in the high-end Total Security 2013.

All these three products include antivirus, antispyware, autopilot, antiphishing, search advisor, and social networking protection features, while advanced features such as two-way firewall, parental control, antispam, anti-theft, safebox, and tune-up features are available in the Total Security, safebox, tune-up, and anti-theft features are missing from the Bitdefender Internet Security 2013.
The anti-theft feature, which is available only in Total Security, helps you control your device even if it’s stolen or lost. You can lock, wipe, or locate the device from any other Internet connected device.

With Bitdefender safepay, one can shop online safely. Safepay automatically opens e-banking and e-shopping web pages in a separate, secure browser. Another new feature, USB immunizer automatically immunizes your USB drive from viruses and other malicious threads. The security widget that sites on your desktop lets you easily drag-and-drop files for quick scan.

All three Bitdefender products sport a clean and straight-forward user interface.
You can download the online installer (web setup) and then run the installer to start downloading the full setup and install the Bitdefender on your machine. In addition to Windows 8, all three products support Windows XP, Vista, and Windows 7 too. Bitdefender is paid software and it comes with 30 days trial-period.

Download Bitdefender Antivirus Plus 2013

MOBILE PARTNER V 21 FREE DOWNLOAD : HUAWEI MODEM DASHBOARD

|1 comments

Have you a Huawei Modem. You might have seen already Huawei modems comes with mobile partner default dashboard with outdated version. Here i am going to provide you download link of latest version mobile partner dashboard which version is 21.003.27.00.03. You can find cool features included in mobile partner 21.003.27.00.03 and free download links for mobile partner at the end of this article has been provided.


Feature Of Latest Huawei Mobile Partner Dashboard :-


Support Voice Call Service
Support SMS Service
Plug and Play
Support All Version Of Windows (xp/Vista/win 7)
Support Mac
Support Ubuntu Linux
Clean User Interface
Easy To use
Bug Fixed On Mobile Partner 21.003.27.00.03 :-

Drivers updated
New Skin Style.
USSD Receive Failed issue fixed.
New font style.
Fix Windows 7 (x86/x64) Compatibility.
SIM Toolkit issue fixed.
Online update added.
New ICON for Desktop.
Screen size fixed.
Mini Frame added.
MMS Removed.
Video call Removed.


How to Access Gmail Offline without Internet on Google Chrome

|0 comments

Gmail is one of the most popular emails today is being used by almost everyone today in this world. We receive our daily communications on our emails, and Gmail is the widely used medium in the world. So what happens most of the time, we need to check our emails which require an active internet connection all the time.

Suppose our internet is down due to some reasons and we want to access the emails then its not possible, hence offline Google mail will help us, but it is possible in Google Chrome only through a simple extension. With this Chrome extension called Offline Google Mail, you can not only access, read your Gmail emails but also search the mailbox, respond an email and also archive any of the emails without the network access.


This extension will allow you to do all the above said actions however it will queue your actions and will sync your all actions when you will be online next time, thereby allowing you to save your time and work offline. This is interesting. But note that, you should not try this extension if you work on a public computer as other users might access your account otherwise he will read all your inbox easily.

Your local mailbox will be synchronized automatically with the Gmail server next time you log in. To use this extension, you should open a new tab in Chrome after installing this extension, and in the new tab pane you will see a Gmail Offline Icon where you should click on the icon, and Offline Gmail will load automatically. Just don’t forget to “Allow Offline mail” when you see the options at the time of first use.

The extension is very easy to use and requires you to first login to your Gmail account so that you can download the extension on your computer. If any question regarding the extension then feel free to contact via comment. Enjoy and share your feelings.


Download Offline Google Mail Extension

How to use internet through Bluetooth on computer

|0 comments
Every multimedia mobile comes with Bluetooth service enabled in his cell/phone. If you have lost your data cable or whatever the reason, you want to use Internet through mobile Bluetooth connection then you are on the right place. You need Bluetooth in your laptop/computer as well as mobile too. Just start Bluetooth on both device and first pair your computer Bluetooth with mobile. If you are getting pairing from computer to mobile, then install mobile PC suite in your PC and then again proceed with pairing.

Note : Operating system does not matter in this process.

If you are using Windows XP then :


  Go to Control Panel > Phone and Modem
  (if don't shows control panel click classic view ) >
  modem tab > huawei mobile connect 3g modem
  (which is present on COM ) > 
  properties advance > in extra initializing command use given
  commands and click OK 

If you are using Windows 7 then :


  Click on start menu > type phone and modem > click on it > 
  modems > huawei mobile connect 3g modem–properties >
  change settings > advance > extra initialization 
  command > use given command.


If any where you are asked for Country and area code then provide as per your country.


  Country – India 
  Area Code – 91 
  Leave other blank


Note : Area code does not matter. You can use any.


Extra initialization Commands For Modem Settings :


Aircel    – AT+CGDCONT=1,”IP”,”aircelgprs.com”


Airtel    – AT+CGDCONT=1,”IP”,”airtelgprs.com”


BSNL      – AT+CGDCONT=1,”IP”,”bsnlnet”


Idea      – AT+CGDCONT=1,”IP”,”internet”


Reliance  – AT+CGDCONT=1,”IP”,”rcomnet”


Docomo    – AT+CGDCONT=1,”IP”,”tata.docomo.internet”


Videocon  – AT+CGDCONT=1,”IP”,”vinternet.com”


Vodafone  – AT+CGDCONT=1,”IP”,”www”


Uninor    - AT+CGDCONT=1,”IP”,”uninor”

For other network provider you have to change only apn as highlighted (AT+CGDCONT=1,”IP”,”aircelgprs” ) and rest all things will be same.

Now create a new dial up connection via Network icon and put dialing number *99# and rest of all thing will be blank. Enjoy this post and if any problem then just feel free to contact.

Easy Steps to Set Bing Homepage Wallpaper As Google Homepage Background

|0 comments

Bing is well known for its homepage wallpapers rather than search results as we have read on the internet in various post. Microsoft launched Bing back in 2009, Bing home page showcases a beautiful wallpaper every day. A year later, Google has also tweaked the homepage and made it possible to add background image to the search homepage.

You can get a plenty of application from internet search, but we have got one really amazing add-on which can do it for you with a single click on first time. But only restriction is that till now it is available for only google chrome browser. If you are Chrome Browser user then it is a good option for you. 
The below link provided add-on will lets you automatically set Bing homepage wallpaper as Google search homepage background with a single clcik. Bing wallpaper for Google homepage is the extension all you need.

Visit Bing wallpaper for Google homepage extension page and add it to your Chrome browser. From now onwards, whenever you open Google search homepage, you will see the Bing wallpaper as Google background. The only catch is that the wallpaper occupies the entire screen area of the Google page, unlike on Bing homepage.

You can change the default settings such as default wallpaper resolution and load settings by opening extension’s options. This extension also lets you set pictures from your Picasa album as Google homepage background. Enjoy bing wallpaper in google chrome and comment on this post.

Customise your Gmail with Custom Image Background

|0 comments
The gmail team has been added a new feature to the world wide popular mail service gmail. In 2008, Google first introduced themes in Gmail to allow users customize their inbox with cool backgrounds provided by google. In last November, HD themes were made available in Gmail.
Now Google has introduced custom themes support in Gmail for his users. Till now, users could use only themes provided by Google. Now, users are able set their own picture as inbox background theme. You can choose pictures from your computer, phone, from photo albums or a web location. Some cool backgrounds are also available to choose from by default provided by gmail team.

If you want to upload and use your own picture, use a picture larger than 2560 x 1920 px to fit in the screen..

How to set your custom picture as Gmail background:

1. Login to your Gmail account. Click the settings gear icon present in the upper right of your inbox and then click Themes.
2. Scroll down the page to see Custom Themes section. Here, click on 'Change your background image'.
3. If you are uploading from your PC, click 'Upload photos' from left side menu and then click 'Select photos from your computer' to browse to the picture location and select your favourite image. Once you have selected your favourite picture, click Open and then click 'Select' button to upload and set the new picture as your Gmail’s background.

Create Windows 8 Bootable USB Drive with Rufus : the fastest tool

|0 comments
I keep writing about bootable USB drive because users can install his operating system in the fastest way. Some of my posts are Create Windows 7 / 8 bootable USB device, Software for making windows 8 bootable, Make bootable USB Windows 8 using WinUSB Maker. Windows users have already a lot of good utilities to create a bootable USB using an ISO file and then install Windows from a USB flash drive. Windows 7 DVD/USB Tool, WinToFlash, and Universal USB installer are the most popular utilities available for creating bootable USB drive.

While every utilities mentioned above do their job very well, the only thing is that all these tools take a large amount of time to transfer the ISO onto the USB. Even though power user prefer creating bootable USB drive via command line to third party tools, novice users always prefer third-party tools for the job.

Users who don’t want to use the command prompt method for creating bootable USB media, for those people Rufus utility is recommended. Rufus is a small utility for Windows and helps you create bootable USB drives. The best thing about this tool is that it’s faster than other tools. According to the developer of the tool, it’s twice as fast as the official Windows 7 USB/DVD Tool, Universal USB installer and UNetBootin tools,  You can see the comparative chart below for the time taken by different tools.
Rufus tool suppost Windows XP (SP2 or later), Windows Server 2003 R2, Vista, Windows and Windows 8, this software also supports Arch Linux, Hiren’s Boot CD, Parted Magic, NT Password Registry Editor, Knoppix, Kubuntu, OpenSUSE, CentOS, Fedora and many other Linux distributions.

Download, run the utility, select your USB drive and browse to the ISO file to begin transferring ISO file contents onto the USB drive and after 4 minutes you will be ready with your bootable USB drive.

Disable or Map Keyboard with KeyTweak Free

|0 comments
One of my friend has got corrupt his keyboard right key and mouse pointer automatically moves on the right side in windows. So I am posting this article. I have tried so many software but I have got KeyTweak is the best solution. KeyTweak is simple to use and also its is freeware. 
If you have got like this type of problem or you want to swap your keys or want to disable some specific key then its is the great option for you. Its is simple to use and easy interface as you can see in the above screenshot. You can view a virtual representation of your keyboard with all the keys numbered 1 through 126. Just click on the key you want to disable and select Disable Key option. Furthermore, you can remap the special buttons which are included in multimedia keyboards (e.g. "Play", "Eject", "Volume Up", "Mute"), as well as the ones found in web browsers (e.g. "Back", "Forward", "Stop", "Refresh", "Home") and power management keys (e.g. "Sleep", "Power Off"). After applying the change you have to restart your computer to take effect.

KeyTweak consumes a low amount of system CPU and memory. It works with all version of windows including Windows XP, Windows Vista, Windows 7 and Windows 8. I have personally tested it with Windows 7 and Windows 8 and it has worked great. 

Download KeyTweak Free

How to Disable Automatic Software Updates on your System

|0 comments
We install a lot of software on our systems, and forget about uninstall or stop automatic update. We use many of them on regular basis and some are kept idle. As there is regular changes in technology, hence every company wants to keep updated his software and keep releasing new version. In several cases I have found that many users have configured the software for automatic update or he did not know how to disable it. Actually it is good to update your software on a regular basis as it helps you to install the latest changes and improvements that have been made in the software. But sometimes this automatic update feature may also harm your system as seen with the latest flash update that caused crashes and system freeze for some Firefox installations. Moreover if you are running a network of computers, you would like to thoroughly review the update before installing it on all systems.
Though there are options available in almost all browsers and software to disable such updates but you have to go through various configurations in your browser or software. Hence we are introducing a software named Update Freezer. The utility works in all version of Windows including Windows XP, Windows Vista, Windows 7 and Windows 8. I have personally tested Update Freezer in Windows 8. Update Freezer helps you to choose disable automatic updates features associated with different software in one go, but you can disable specific software also. Moreover other programs like Windows update, Adobe reader update and Skype update etc can also be managed from this single application only which is the best option for novice users also.

To start using the application, download the software and install in your computer and run the application.  Mostly all the popular software are listed there in the list of this program. The program will automatically detect the update related information and will display in its main interface instantly. You can configure the settings there only. This is a free to use application without ad ware. The utility is quite handy and useful as well. You can grab it from the link given below official website link.

Download Update Freezer

How to uninstall any software from Windows 8

|0 comments
Windows 8 has been released and its is totally different from windows 7 or other windows operating system we have used earlier. But, by the way Windows 8 is the best than other operating system of microsoft earlier released. As I have told that it is different from other operating system, hence you will get difficulty using Windows 8 a few days. Installing any software in Windows  8 is still easier, but uninstalling is a little bit different, hence, we are writing article about how you can uninstall any software from Windows 8 or how you can remove any default programe of windows 8 from Start.
To uninstall any software or to remove any programme from Start go to start using Windows key from keyboard. Here, right click on the any application or software which you want to remove from Start.
Now you will get "Unpin from start" and also "Uninstall" extreme below left corner as in above screenshot. Click on Unpin from start if you want to remove the application only from Start and click on Uninstall if you want to totally remove from windows 8. Enjoy and share with your friends.

Download and use Google Chrome Metro Version For Windows 8

|0 comments
Google Chrome is one of the popular web browsers available for Windows in this world. Maximum users prefer Chrome than other browsers for its fastest engine and simple UI. Chrome browser lovers who are running Windows 8 can now experience the new Metro-style version of Chrome browser by downloading the same from the developer channel for free.

Google has released Chrome 21.0 to the developer channel and it supports Windows 8’s Metro. As this is the first release of the Metro version, some features are missing in it. This version supports the touch-screen and also Windows 8’s charms.
Guide how to install and setup Google Chrome Metro in Windows 8:

1. Visit this official page, download the setup from dev channel and complete the installation.

2. Launch the desktop version of Chrome browser from desktop, click on wrench menu and then Settings. Click Make Google Chrome my default browser button to set Chrome as your default browser. If you see a dialog asking “How do you want to open this type of link?” select Google Chrome and then press enter.

3. Switch to Search screen in Windows 8 from the desktop (to switch to search screen from the desktop, keep your mouse curser to extreme right corner of the top and you will get Start) , type Default Programs, and press Enter key to launch the same.
4. Now click on the default programs and you will get a screen like below.
5. Click on “Set your default programs”. Select Google Chrome entry in the left-pane and then click Set this program as default button present on the right-side. Click Ok and you are done. Now Google Chrome is your default browser in Windows 8.

6. Switch to Start screen and you will see the Metro-style Google Chrome browser icon. Click on the Chrome tile to launch and experience the Chrome Metro for Windows 8.

You are not able to see your Google Chrome Icon then just press right key from your keyboard and you will get this.
To adjust the position in Start just drag the icon and position will be changed of your apps.


Download Google Chrome Metro Style From Official Website

Download Link Intel HD Graphics Driver For Windows 8

|0 comments
Good news Windows 8 computer users who are testing Windows 8 on a computer with Intel HD Graphics. Intel, manufacture of microprocessors, has released HD Graphics drivers for Microsoft’s newest version of Windows to help users of Windows 8.

Drivers are available to support for 2nd generation Intel Core processors with Intel HD Graphics 3000/2000 and Intel 3rd generation Intel Core processors with HD Graphics 4000/2500. According to a press release from Intel, these drivers support flicker free rotation, Microsoft DirectX 11, and native stereoscopic 3D.

Different download links are available for x86 and x64 versions of Windows 8. So, make sure before download the right version of the driver you have chosen. It is suggested to create a system restore point before installing the driver in your PC or Laptop.


If you are not sure what Intel processor or graphics you are using, please use Intel® Processor Identification Utility or your can use the Windows display properties. 

Download Intel® Processor Identification Utility


Download Intel HD Graphics Driver (32-bit)
Download Intel HD Graphics Driver (64-bit)

Download Link of Realtek HD Audio Driver For Windows 8

|0 comments
Good news for windows 8 users who are using Realtek audio. Realtek has just launched High Definition Audio Codecs R2.69 and the latest version now supports Windows 7 as well as Windows 8 operating system. Windows 8 users can now download and install the newest version of the audio driver to get Realtek HD Audio Manager to control various audio related settings.
According to Realtek, version R2.69 for Windows 7 and Windows 8 supports ALC882, ALC883, ALC885, ALC887, ALC888, ALC889, ALC892, ALC899, ALC861VD, ALC660, ALC662, ALC663, ALC665, ALC671, ALC672, ALC676, ALC680, ALC221, ALC231, ALC260, ALC262, ALC267, ALC268, ALC269, ALC270, ALC272, ALC273, ALC275, ALC276, ALC280, ALC282, ALC283, and ALC290 chipsets. You can also download the read me PDF file from the download page to know more about changes and fixes done by Realtek company.

Separate downloads are available for x86 and x64 systems. So, make sure you download and install the right version. R2.69 is also available for Windows 2000, XP, Vista, and Windows 7 operating systems.

If you receive “Windows can’t verify the publisher of this driver software” during the installation, simply click “Install this driver software anyway” to continue the installation. You may need to restart the PC to complete the installation.

Use sfc /SCANNOW command to repair any version of windows

|0 comments

You can repair your windows in various ways if some dll or files have been get corrupted on your computer/laptop. But, from different types of repair solution available, I have felt that sfc /SCANNOW is the best solution. The sfc scannow option is one of several specific switches available in the sfc command, the Command Prompt command used to run System File Checker. sfc /scannow is the most common way that the sfc command is used.
Sfc /scannow will inspect all of the important Windows files on your computer, including Windows DLL files. If System File Checker finds an issue with any of these protected files, it will replace it.

Before using this command you must be logged in as administrator rights in order to run the sfc /SCANNOW command.

Using sfc /SCANNOW  to repair important Windows files usually takes 5 to 10 minutes. If you are repairing your windows Xp or Windows 2000 then when ever you will use this command then its will ask you for original CD, if you are repairing your Windows Vista / Windows 7 or 8 through this command then its will not ask even for original DVD and its will repair your Computer withing 5 to 10 minutes.

How to use step by step guide :

1. Open Command Prompt (Just press windows key and R from keyboard).

Important : You must run Command Prompt as an administrator in Windows 7 and Windows Vista to use System File Checker.

2. Once Command Prompt is open, type the following command and then press Enter.

sfc /SCANNOW

Note: There's a space between sfc and /SCANNOW

System File Checker will now verify the integrity of every protected operating system file in your computer/laptop.

Restart your computer after the completion of sfc /SCANNOW command.

Note: System File Checker may or may not prompt you to restart but even if it doesn't, you should restart anyway.

After a few minutes your computer is ready without formatting.

how to improve alexa ranking for free more than 20 percentage

|0 comments

What is Alexa Ranking - Alexa is website measurement service. Alexa is a company founded in 1996 with a goal to make a connection between web users and websites. Using its famous toolbar and further estimation, Alexa created a way to measure website traffic, reach, page views and other factors by visitors, by country. Alexa ranking is known world wide and webmasters use it to estimate other websites as well as their own website also. The higher your website alexa rank will be, people will get more attracted on your website.


Improving your Alexa ranking will boost your traffic in other search engines too. You can improve your ranking in alexa using a free trick. First you make sure from which computer you are updating your website put alexa toolbar on that computer. You can  put toolbar in your computer through this link. At least write one article in your blog alexa related. But, these process will increase a ranking little more. I am going to write below article which will suddenly increase your website or blog ranking 20% at least in a day. I have experimented this in my blog now I am writing on my blog.

How to Increase Alexa Rank By More Than 20%

Want to improve your Alexa Rank by more than 20% first install widget of alexa. To install Alexa widget on your website or blog first register a account on alexa. After registering a account on alexa follow the step by step guide :

1. Login to your alexa account.
2. Go to My account.
3. Now click on Dashboard.
4. Here you will get "+Add a Site" button on the right side of the page.
5. Here click on Sign Up below Free.
6. Here you will get a text box below Website URL. You your blog or website url and click on Continue button.
7. Now you will see a windows like Claim Your Site. Here you have two options. On the left side alexa is providing a file to download and another site alexa is providing a code to put in site or blog. Copy the code provided on the right side.
8. If you are going to put into your blog then do not copy html and head tag. Without tag your alexa code will be like this : 
9. Now open a new tab in your browser and login to blogger account.
10. Go to template tab and click on Edit HTML.
11. Now clcik on Expand Widget Templates.
12. Now put your copied code between the head tag anywhere and save the template.
13. Now go to alexa tab in your browser. Below the code you will  find Verify my ID. Just click on Verify my ID.
14. Now you will get a message Your site is successfully claimed.
15. Now click on site tools and below the page you will find alexa site widgets or click on this link alexa site widget
16. Now below Alexa Site Stats Button put your site address and click on Build Widget.
17. Now its will create 3 types of code and 3 types of widget. Copy any code which suites to your website and put the code on your blog with the help of Layout of your blogger.

I am sure this process will increase your Alexa rank of your website. Enjoy.
Share